R/C Helicopter Hobby in Singapore
|
| Home | Why R/C Helicopter? | How to start? | Setting up | Articles | Flying Lessons | Links | Message Board | For Sale |
By chance of fate, I started this hobby with a JR X388 transmitter. Ever since, I'm using JR transmitter. Now, I'm a proud owner of a JR X3810 PCM radio transmitter. However, many of the cool gadgets available for r/c helicopters are not made by JR, but their rival Futaba. In this article, I will talk about using the probably best engine rpm governor Futaba GV 1 with the JR X3810 PCM radio.
Please refer to page 21 of the GV 1 manual. It shows the figure for connecting servo and channels to the GV 1 control amp. Follow the instructions and connect the magnetic sensor and throttle servo. I'm using JR NES517 servo for the throttle in my Sceadu 50. Note that the white wire for Futaba matches the orange wire for JR. I do not use the mixture servo, so I will skip that.
Next, connect the throttle channel from the control amp to the JR reciever throttle channel. You need to file off the flap on the Futaba connector in order to plug it into the JR reciever. Ok, here comes the tough part. The manual only says how to use the GV 1 with Futaba transmitter, but not JR transmitter. For my case, I want to tie the speed setting channel to my flight mode switch. This is because I want a different rpm settings for each flight mode. The flight mode switch on my JR X3810 is tied to aux channel 3. Locate aux channel 3 on the reciever and plug the speed setting channel wire into that postion. Now, jump to page 27. Go to the program menu on the GV 1 control amp and go to the speed setting function. As you flick the flight mode switch on the transmitter from normal, to idle up 1 and to idle up 2, you will see on the GV1 control amp screen that the readings change from xxxxrS1 to xxxxrS2 to xxxxrS3. Good, you have set up the speed setting channel correctly. Use the "+" and "-" button on the GV1 to set the desired rpm settings for each flight mode. I'm using 1600rpm for normal, 1700rpm for idle up 1 and 1750rpm for idle up 2 on my Sceadu 50.
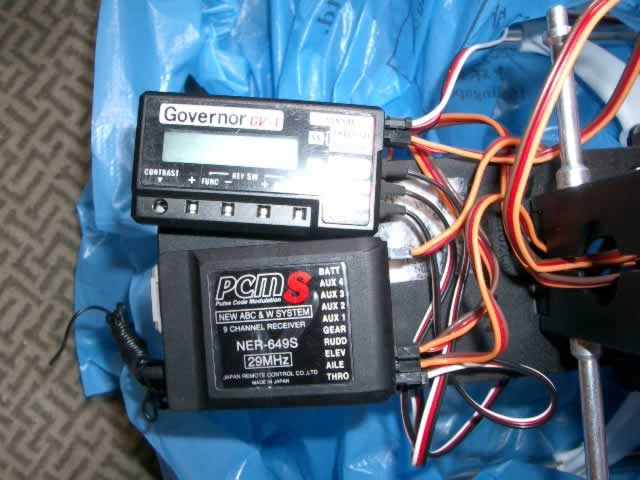
GV 1 and JR NES649 recevier. Oops, only the throttle channel is connected. The speed setting channel should be connected to AUX3 and On/Off channel is connected to GEAR.
The last step of connecting the GV1 to JR X3810 is the On/Off function. I want to turn the GV1 On/Off using the Gear/Invert swtich on the JR X3810. Locate the Gear channel on the reciever and plug the On/Off wire from the GV 1 into that position. Remember to file off the flap. Then, go to page 29 on the manual. On the GV 1 control amp program, go to the page "SWPt OFF". Flick the Gear/Invert swtich on you JR X3810 up and down. You should be able to see "SWPt OFF" when the switch is up and "SWPt ON" when the switch is down. Great! You have now set the On/Off function!
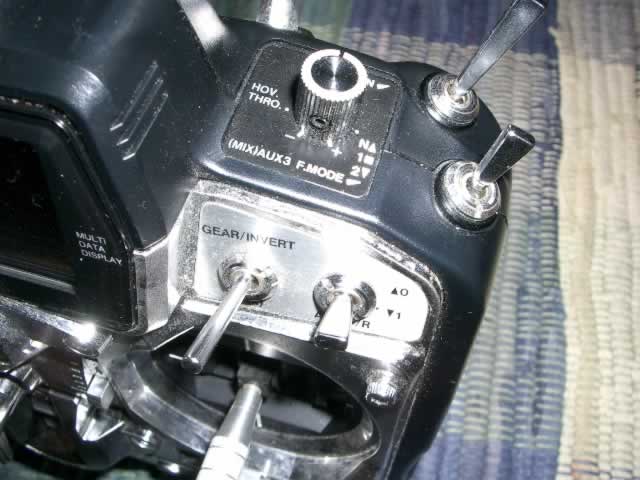
For my JR X3810 transmitter, flight mode is tied to AUX 3 channel and GEAR/INVERT is GEAR channel. Your JR X3810 may have different settings. Check the manual and the labels on the transmitter.
Then follow the instructions on the manual and program the GV 1 accordinly.
Ok, I have to clear some common doubts. If the GV 1 is turned off by the transmitter, it will not engage when the throttle is increased. But if the GV 1 turned on, it will engage when the throttle is increased. A common mistake is that people tend to forget about the throttle curve when they are using the GV 1. It is important to have a proper throttle curve for all the flight mode. This is because the GV 1 turns off when the throttle curve is less than 20%. So if you are in inverted flight and you still have a straight line throttle curve, your GV 1 will disengaged. The engine will lost power and you heli will drop like a rock. Follow your helicopter manual and set the appropriate throttle curves. Anyway, in the unlikely event that the GV 1 fails, you will have to depend on your throttle curve to bring the heli safely back to ground.